|
HARDWARE 1 course of YBET Informatique |

|
| YBET | CONTACT | Hardware training |
23. The BIOS - Setup configuration
1. UEFI - 2. Bios - Setup
3.1. Standard CMOS Setup - 3.2. Frequency Voltage Control - 3.3. Advanced Bios Standard - 3.4. Advanced Bios Features Setup - 3.5. Power Setup Management - 3.6. PNP/PCI Setup Configuration - 3.7. Integrated Peripherals - 3.8. PC Health Status - 3.9. Load Fail-Safe Defaults
The BIOS (BASIC Input System Output) takes again the whole of the Firmware of the PC motherboard, the SETUP is the program which takes again to the configuration (parameter setting) user of the BIOS. This treacherous chapter thus of the SETUP and not directly of the BIOS. The BIOS is different for each motherboard. If this chapter treats BIOS in general, we will see the BIOS of the computers of the type AWARD, with each time several possibilities for each headings.
For new Motherboard, BIOS is replaced by UEFI with new features, not only graphic design.
To open Setup or UEFI, it is necessary on the starting of the computer to push key < Del > (most used) or < F1 > or <F2> or < F8 > or < ESC > (this depends on the motherboard). On IBM, it is necessary to await a white square in top on the right of the screen. In certain cases, when Starting with keyboard removing, the code to be returned appears on the screen, remains more than to replug the keyboard.
2. UEFI
2.1. Overview
 As we are going to meet him more and more as it replaces the old BIOS, start out by him. Compared to the preceding, the first amendment is related to a true graphical interface that can be controlled with a mouse PS2 or USB (finish the CGA mode). At the technical level, the UEFI to use GPT partitions (which replace the MBR) exceeding the limit of 2.2 TB of capacity. To do this, the disk management is quite particular: operating systems all resumed on a boot manager (simple boot or with multiple concurrent operating systems). This isn't the only change since, by default, UEFI checks the operating systems installed. Not only should be recognized by the firmware (so in ROM) but they are also signed. Systems that are not known are refused (including versions of Linux but also everything that predates Windows 8 (thanks Microsoft). The signature prevents the start of corrupt systems (viruses for example, but also probably a wide version of Windows systems pirated by modifying a part of the
code).
As we are going to meet him more and more as it replaces the old BIOS, start out by him. Compared to the preceding, the first amendment is related to a true graphical interface that can be controlled with a mouse PS2 or USB (finish the CGA mode). At the technical level, the UEFI to use GPT partitions (which replace the MBR) exceeding the limit of 2.2 TB of capacity. To do this, the disk management is quite particular: operating systems all resumed on a boot manager (simple boot or with multiple concurrent operating systems). This isn't the only change since, by default, UEFI checks the operating systems installed. Not only should be recognized by the firmware (so in ROM) but they are also signed. Systems that are not known are refused (including versions of Linux but also everything that predates Windows 8 (thanks Microsoft). The signature prevents the start of corrupt systems (viruses for example, but also probably a wide version of Windows systems pirated by modifying a part of the
code).
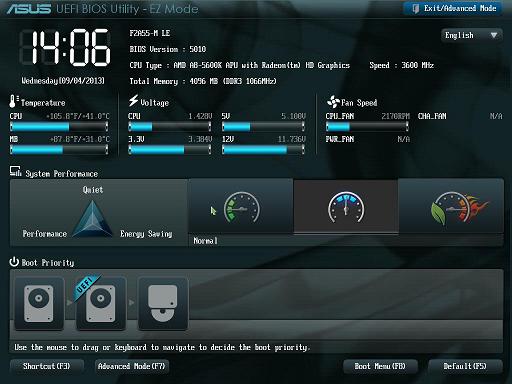
C programming allows other changes: UEFI recognizes standard key USB, network card, and even screenshots. It come directly from an ASUS motherboard.
The first page displays the used processor, voltage, temperature settings, speed of the processor fan... It is in part advanced mode (F7) that the actual indications and settings will be useful
2.2. The Advanced mode.
Those who are used to set up the old BIOS will find a majority of commands. Instead of different menus, all gathered in six parts.
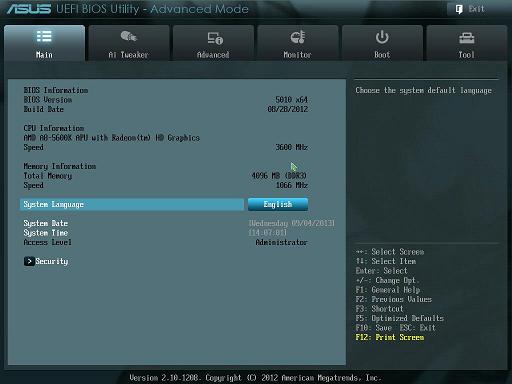
Main: displays the CPU and memory, allows to password at startup or for access to the settings. His main interest is access to the safety (security) part, we'll further since this part allows to install the older operating systems.
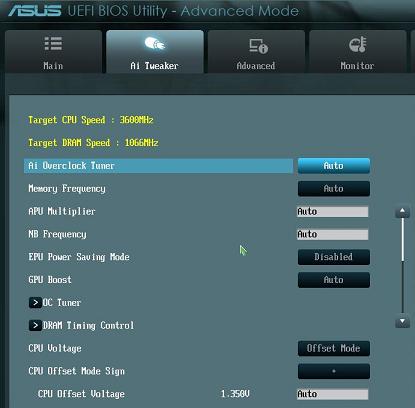
AI Tweaker corresponds roughly to Advanced Bios Features Setup of the old BIOS and consolidates overcloaking opportunities. In our case, the AMD processor integrates the GPU (graphics chipset), its setting is also in this part.
Advanced, allows to activate (or not) the main devices. On this motherboard, it is used to enable the onboard audio, select the type of connector (signal) used by the audio portion on the front panel and the rear panel SPDIF version, map network and the configuration of the serial and parallel ports.
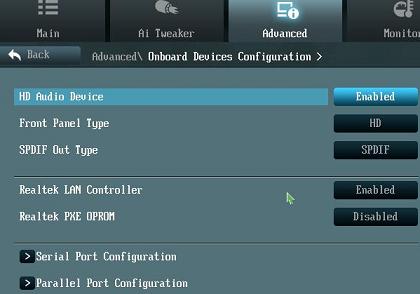
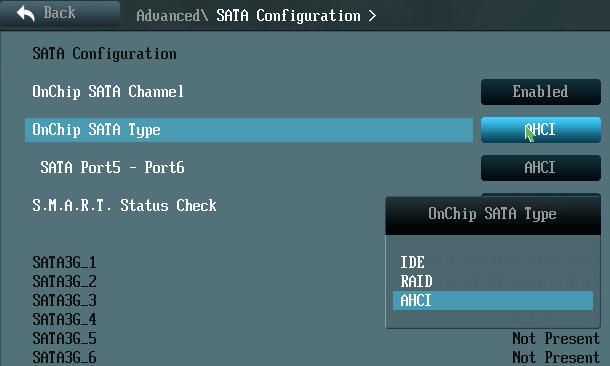
Other options, the management of SATA hard drives with particular RAID hardware, SMART management must be always enabled.
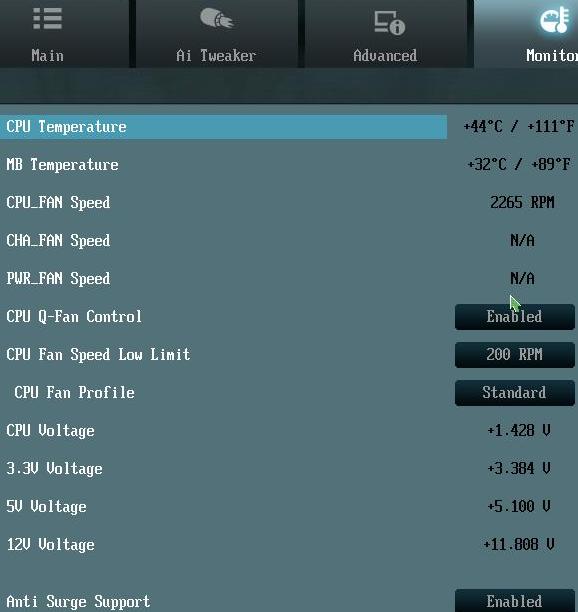
Monitors, resumes the different temperatures and fan speeds, including "CPU FAN SPEED Low Limit", the minimum of one processor speed so that the motherboard will accept to operate, it is a protection of the processor.
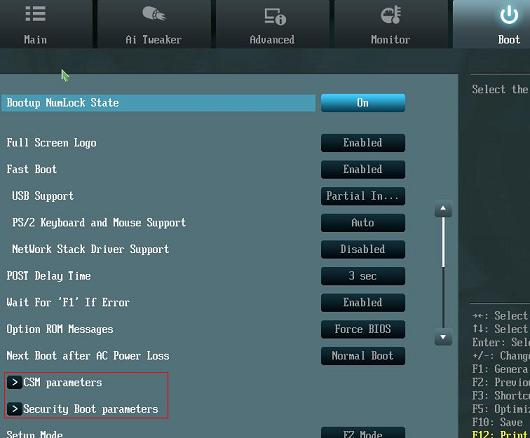
Boot, incorporates a set of options without meanings as the display of the logo of the brand of your motherboard at startup more detection of the type of keyboard - mouse, error messages management,... There are two options specific to the UEFI operating systems management.
Tools is specific to the ASUS motherboards for the possibilities of flashing BIOS or auto-parameterization of all submissions via the SPD Eprom memories since the DDR modules integrated.
2.3 Security Boot parameters
 Here we are in the part that upset, but above all the more interesting for technicians. Since the introduction, we know that UEFI prohibited by default use legacy systems operating Windows and several Linux distributions (as well, but it is obsolete). CSM parameters and boot security will allow us to remove settings anti-old versions of Microsoft and anti-competitive. Both parameters must be configured. Small example, I re-install an ACER PC comes with Windows 7 Pro by default but also preinstalled in Windows 8. A relocation with the DVD of restoration of Windows 7, cannot start the installation with the boot security option. Once configured, the installation is normally and reboot, it is very slow: this time it is CSM which must be set to return to normal operation when
starting.
Here we are in the part that upset, but above all the more interesting for technicians. Since the introduction, we know that UEFI prohibited by default use legacy systems operating Windows and several Linux distributions (as well, but it is obsolete). CSM parameters and boot security will allow us to remove settings anti-old versions of Microsoft and anti-competitive. Both parameters must be configured. Small example, I re-install an ACER PC comes with Windows 7 Pro by default but also preinstalled in Windows 8. A relocation with the DVD of restoration of Windows 7, cannot start the installation with the boot security option. Once configured, the installation is normally and reboot, it is very slow: this time it is CSM which must be set to return to normal operation when
starting.
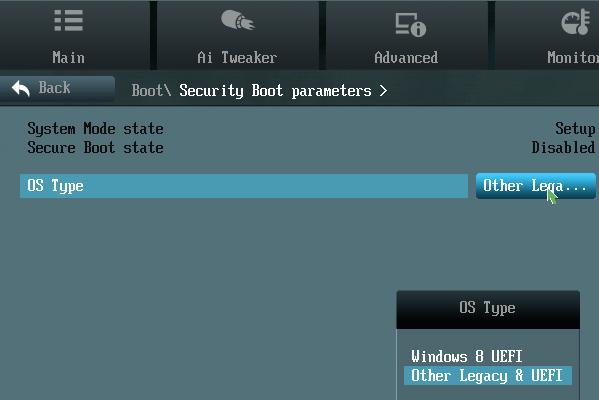
Let's start by Security... and then: Operating System type, the solution is not to put Microsoft's operating system dedicated to game DS3 consoles but other (which also incorporates Windows 8).
... and for CSM, remove the AUTO mode

In recent years, Microsoft seemed open to other editors but with the consortium UEFI with several manufacturers of motherboards and processors, it is finished.
3. Old BIOS
Each parameter has its utility. Nevertheless, in the majority of the cases, they can be left by defect. The mark ! is to be taken into account for normal PC, without testing all the options.
To move, use either the arrows high - low, or the entered key. To modify a value, use the keys < Up Page > - < Down Page > or < + > and < - >. Remark, you can use the key < verr num > to activate the digital keyboard.
3.1. Standard CMOS Setup
Standard CMOS gathers the configuration of the hard disks, Floppy drive, clock and memory. The latter is always detected automatically.
With. 440 BX for Pentium II and Pentium III, FSB (Front Side Bus) 100 MHz.
! Time is identical to the parameter settings by the operating system.
! In the case above, 4 discs IDE can be to parameterize in AUTO. Nevertheless, in heading "IDE HDD AUTO DETECTION", you can make a detection once for all this allows to save time with starting. This is not valid any more for the new motherboards. For the problems of detection of the hard disks (capacities), you can refer in chapter 10 of the course hardware of first year.
The disk drives DRIVE A and DRIVE B are currently always 1.44 MB for A and None (no) for B.
Video must always be EGA/VGA.
! Halt One: always on All Errors. This stops the chart in the event of problem. Other possibilities:
| No errors | Starting (boot) does not stop in the event of error |
| All Errors | In the event of error, the system stops and announces the error |
| All, but Keyboard | The system does not start in the event of error except if it does not detect a keyboard |
| All, but diskette | The system does not start in the event of error except if it does not detect a disk drive. |
| All, but Disk/Key | The PC starts in the event of discs error or keyboard, but stops for all the other errors |
The memory is detected automatically. Note, the kilo Byte is always referred in 1000 in hardware and 1024 for the software.
B Apollo KT-133 for Athlon - Duron FSB 100 MHz, motherboard QDI Kinetiz
Preliminary detection of the hard disks is this time not established in a menu in the BIOS, but in the "Standard setup".
While positioning on a disc and while pressing on the < Entered > key, you return in the window below:
If you press on key < ENTREE >, auto-detection fixes the type of hard disk
present in the machine.
| Cyls | A number of cylinders |
| PRECOMP | Pre compression of writing |
| Sector | Numbers of sectors |
| Head | A number of heads |
| LANDZ | LANDING ZONE |
| Mode | Access mode to the hard disk (CHS, LBA or Broad) |
CHS: no transformation is carried out during the transfer of the data this is specific to disc IDE and the capacity is limited to... 528 MB
! LBA (Logical Addressing Block): This mode makes it possible to exceed the 528 MB. The number of cylinders, heads and sectors are not the physical numbers included in the hard disk. It is most current
BROAD mode: certain discs IDE contain more than 1024 rolls without support LBA (for certain operating systems of the UNIX type, except for Linux, this is obligatory). In this case, the limitation of the 1024 rolls is done by dividing the exact number by 2.
3.2.Frequency Voltage Control
This order allows the auto-detection the speed (intern and external of the processor and its supply voltage. It appeared only with Pentium II, Duron - Athlon or superiors. Since it is only starting from these processors that the speed of the processor and the supply voltage are auto-detectable. In certain Setup, this function is also called Speed Easy CPU setup.
This part does not pose problems.
3.3. Advanced Bios Standard
It is here that one is likely to fall from with dimensions obscure from the PC (not of the force). This configuration is generally little modified (except to optimize the BIOS) and often actuates disfonctionnement PC. Nevertheless...
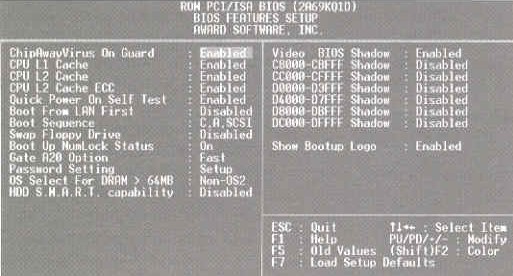
!ChipAway Virus One Gard: Enabled protects the sector from starting (boot sector) of your hard disk against the writings, the work of some viruses. Other side of the coin, this poses some problems. In Win95, the installation stops abruptly. This was corrected in Win98 but, this function often causes into 98 and Millenium of the ineffective and prolonged stops. It preferable of is decontaminated (DISABLED) and... to update a regularly put antivirus.
CPU internal Enabled mask authorizes the masks internal L1 and L2 with the processor. In certain cases of periodic plantings of PC, try to return it disabled. This slows down the machine and is to be used only in tests. The processor is then to change.
External Cache L2 makes it possible to authorize (Enabled) or to remove (disabled) the external mask. For recall, since Pentium II, the L2 mask is integrated in the processor.
Cache L2 ECC: authorize or not the ECC memory on CPU L2 cache. The ECC is a checking and correction of error of the memory. It is in practice used only in the servers of high range but is established in mask CPU
Quick Power One Test self-service configures some tests of the BIOS at the time of the starting of the PC and thus to accelerate starting.
Boot from Lan First Starts the boot of the machine via the chart network. This one must accept this function. In practice, one never uses this function and the chart network must include Eprom. On the new charts network, the socket for the eprom is not installed even any more.
!Sequence BOOT makes it possible to specify which sequence of disc is used for starting. Since Win98/2000, one uses initially CD-Rom, then a:, C:, ... All the possibilities do not exist. To start on CD-Rom in first makes it possible to insert CD of installation of the operating system (Win98/2000/XP) without having to parameterize CD-Rom under Dos with a diskette.
Swap drive the disk drive must be connected to the motherboard via the 2 ends. This possibility makes it possible to connect the reader on the connector of the medium (without wire inversion).
!Boot Up Numlock Status makes it possible to start the PC with the activated digital keyboard. This does not function for the operating systems NT.
Gate A20 Option Gate A20 refers to the way in which the system addresses memory higher 1MB. In normal mode, the A20 signal is controlled by the controller of keyboard or a specific circuit. In mode FAST (fast), it is controlled by the chipset.
Typematic Rate Setting the repetition by the keys of the keyboard is determined by the controller of the keyboard. By authorizing this function, you can control the 2 options below: the time of repetition and the speed of repetition. For recall, this function is integrated in Win95 and following. Here, it is useful only in DOS.
Typematic Misses (Cars/sec.). Between 3 and 60, the speed of repetition of the same key.
Typematic Delay (mSec.) determine the time for the repetition of the keys (between 250 and 1000 milliseconds).
!Password Setting. It is here that one determines the passwords System which prevents the starting of the machine and the access to the BIOS or Setup which blocks only the access to the BIOS. This function is not established in all the BIOS and certain charts integrate a bridging on the chart which removes starting by the Power button of the case, only by typing the password.
OS Select For DRAM > 64 MB Non OS2 by defect. OS2 manages the memory higher than 64 MB in a personal way.
! HDD S.M.A.R.T. capability allows activated function smart for the hard disks, provided that the hard disk accepts it. This means Coil-Monitoring Analysis and Reporting Technology. It acts of a mechanism of prevention of the breakdowns. The hard disk is supposed to warn the user of a breakdown approximately 72 hours before the latter does not occur. The checking is done with the starting of the PC and does not affect any the performances.
Video Bios Shadow makes it possible to copy the video bios in memory RAM, which increases the speed of posting
C800-CBFFF... DC000-DFFF makes it possible to copy the optional ROM (by 16K) towards the associated memory (with dimensions obscure of IT, even if the RAM is faster than a Rom)
Show Bootup logo specific to the charts of mark QDI, makes it possible to post or not logo QDI (or another) with starting.
Other possible options:
! flash Write protect allows for the BIOS directly flashable to protect this function. It is more effective with the bridging generally placed on the motherboard.
3.4 Advanced Bios Features Setup
Advanced Chipset Features Setup makes it possible to manage specificities of the chipset of the motherboard. The majority of the orders are useless for configurations standards and are detected automatically but allow to optimize the BIOS. This part includes/understands the configuration of the memory of the computer and bus AGP for the graphics accelerator
DRAM Clock/ Drive Control
Clean FSB Frequency (Only Athlon XP): allows to post the processor FSB speed (Front Side Bus). This one is determined by bridging on the motherboard
Current DRAM Frequency (100 - 133 - 166 - 200): allows to manually determine the speed of the memories used. For recall, DDR use a double notation. A DDR 400 will have thus to be announced like 200.
DRAM Clock (identical to Current DRAM Frequency): allows to adjust the speed of the memories. Option SPD (Serial Detect Presence) makes it possible to let the motherboard select it automatically.
DRAM Timing (SPD, manual, turbo, Ultra): allows to increase the timing of the memory. This is related to the cooling of the memories.
DRAM Burst Length: This makes it possible to improve the performances of the memory. The burst makes it possible to send the data in mode "gust".
DRAM Tail Depth (2/3/4 Level): also related to the mode "Rafale", allows to define the number of data sent of only one blow.
DRAM Command Misses (1T/2T): determine the time between the signal CS (Chip select) and the acceptance of the order. Also called Latency, T is the period of clock.
Write Recovery Time (2T/3T): specify the time (in cycles of clock) which must be inserted between an operation of valid writing memory and a cooling report, 2 cycles for DDR 200 and DDR266, 3 cycles for the DDR333 and DDR400
DRAM twTR (1T/2T): dependent on Write Recovery time above, 1 cycle (1T) for DDR 200 and 266, 2T for higher speeds.
! AGP Size Aperture (4/8/16/32/... 256MB). This makes it possible to determine the maximum size of memory which the chart screen AGP can use in the standard memory of the PC. In the case of a motherboard with too much memory compared to memory PC available, it is here that it is necessary to parameterize for the starting of certain plays.
AGP Driving Control (Auto/Manual): the default value is recommended.
AGP Driving Been worth (00 - FF): to use only when graphic accelerators AGP 4 X do not function correctly in bus AGP 8X
AGP Fast Write (enabled/disabled); allows to activate or not the mode of fast writing AGP, according to the speed of memories DDR.
AGP Master 1 WS Write (enabled/disabled): allows to activate a latency (Wait state) in writing
AGP Master 1 WS Read (enabled/disabled: allows to activate a latency (Wait state) in reading
Vlink 8 X support (enabled/disabled): allows to activate the support of VLINK bus (specific to VIA chipset for Athlon)
Others less current can also be met (to be modified with extreme prudence) like
CASE delay or CASE latency (Column Adraws up Strobe): a many cycles of clock enter the reading command and the arrival of the data
SHORT-NAP CLOTH Precharge Time (Row Adraws up Stobe): a number of cycles of clock between 2 accesses to a line of data.
SHORT-NAP CLOTH To CASE delay: a many cycles of clock enter the access of a line to a column
SHORT-NAP CLOTH activates Time: a number of cycles of clock for the access time to a line
3.5. Power Setup Management
This function makes it possible to activate the various systems of energy saving.
ACPI Function (Enabled/disabled): allows to activate the function of energy ACPI
ACPI Suspends Standard (S3/S1): mode of energy saving - S3 by defect.
Mode suspends (sayable 1 Min... 1h.): allows automatically to put the PC in old mode as for the portable PC.
3.6. PNP/PCI Configuration SETUP
PNP OS Installed (Yes/No): allows to let the operating system (Yes) assign automatically the interruptions or not (given directly by the BIOS). In the case more running, case YES is used. On the other hand, for a PC integrating a great number of peripherals PCI, solution YES poses some problems. The passage of one with the other at least requires to give the drivers for Windows and in certain cases to reinstall the operating system. This is in particular related to the parameter "Resource controled by"
Configuration RESET DATED (enabled): allows to give all the parameters of the BIOS by defect. It is the setup equivalent of Clear Cmos.
Resource Controlled By: Manual or AUTO (ESCD). This order makes it possible to assign resources (interruptions and DMA) manually. This function is generally obligatory only if you use charts ISA (not plug & Play), which is impossible with the new motherboards.
! Assign IRQ for VGA: allows to assign an interruption with the graphic card. This option must be activated. Many PC remain on the screen "You can extinguish your PC..." if this option is not activated.
Assign IRQ for USB: allows to assign an interruption for the ports USB, Oui by defect.
3.7. Integrated Peripherals
This part is one of most important. It makes it possible to configure the ports, controllers hard disks....
IDE DMA Transfer Access: allows to activate the DMA on ports IDE
One Chip IDE Channel 0/1: allows to activate or not ports IDE. In the case of utilsiation without discs IDE (SCSI or S-ATA), this makes it possible to recover an interruption. Port IDE 1, reserved to the readers CD - engravers is generally always used.
IDE Prefetch Mode: Generally activated. Nevertheless, perhaps decontaminated for Windows NT which does not use the BIOS for the accesses hard disks.
Primary/secondary - Master/Slavic PIO: allows to pass manually in PIO 0 to 4, auto by defect.
Primary/secondary Master/slave UDMA: allows to activate the UDMA (100/133) for the hard disks, auto by defect.
! IDE HDD Block Mode: allows to activate the block mode (transfer of the data by block). This function causes sometimes instabilities for hard disks ATA-33.
USB 2.0 Support: activate ports USB 2.0
USB Keyboard Support: the detection of keyboard USB allows. This function is not necessary any more in the new motherboards.
Onboard FDC To control: allows to activate the controller of the disk drive.
Onboard Serial 1/2: allows to activate and assign (com1, com2, com3, com4) the 2 ports series present on the motherboard.
Onboard Parallel Port: allows to activate and assign the parallel port (378/278/3BC)
! Init First Display: initialize a graphics accelerator PCI or AGP in first. Except in the case of 2 graphic board (including 1 PCI), AGP
3.8. PC Health Status
This function makes it possible to put protections of temperature, to post the temperatures on the motherboard and the processor, to check the number of revolutions of ventilator CPU...
3.9. Load Fail-Safe Default
This function makes it possible to at least start the PC with all the parameters of the setup. This is used for unstable machines.
3.10. Load Optimized Default
Charge the parameters of optimum factory. This should improve the speed of operation of the PC computer. The parameters reports remain nevertheless with minimum.
3.11. Others
These orders are sometimes met in Bios of some motherboards
. Burst refresh and Hidden refresh. This order is related to the PC memory refresh. This is done at the time of access reports of the processor or by a specific order REFREH on the control bus. The second type is faster.
In relation:
- Course: Microprocessor PC Evolution, list and characteristic of the Processors.
- Course: Motherboard Installation Assembly and parameter setting of the processors and motherboards in a PC
- Course: IDE and SATA hard disk Characteristics and standards of IDE hard disks
|
The continuation of the hardware 1 Training > 24. Upgrade and repair |
The hardware course first (computer and peripherals equipments). The network equipment course - Operating system (DOS - Windows)
![]()
Competences with the service of quality in Belgium.